Contents
- 1 Efficient Techniques for Removing Chicken Pin Feathers with a Chicken Plucker
- 2 Tools and Equipment for Removing Chicken Pin Feathers
- 3 Step-by-Step Process of Removing Chicken Pin Feathers
- 4 Tips for Efficiently Removing Chicken Pin Feathers
- 5 FAQ
- 5.1 What are the most effective techniques for removing pin feathers from chickens using a Chicken Plucker machine?
- 5.2 Are there any specific tips or tricks for ensuring all pin feathers are thoroughly removed during the plucking process with a Chicken Plucker?
- 5.3 Is there a recommended temperature or soaking time that helps in loosening pin feathers before using a Chicken Plucker for efficient feather removal?
- 5.4 Related Posts

, your ultimate guide to all things chicken! Here, we’ll be delving into the art of removing those pesky chicken pin feathers. Learn the best techniques and tips to make plucking a breeze. Get ready to master the art of feather removal like a pro!
Efficient Techniques for Removing Chicken Pin Feathers with a Chicken Plucker
One of the most essential factors in chicken processing is efficiently removing pin feathers with a Chicken Plucker. Although this task may seem tedious, employing proper techniques can significantly streamline the process. Here are some effective methods to ensure efficient pin feather removal:
1. Pre-plucking preparation: Before using the Chicken Plucker, it is crucial to ensure that the birds have been properly scalded to loosen the feathers. This can be achieved by immersing the chickens in hot water (around 140-150°F) for a few minutes. The hot water softens the feather follicles, making plucking easier.
2. Adequate plucking time: Placing the chickens in the plucker for an appropriate amount of time is essential. Leaving them in for too short a duration may result in incomplete feather removal, while excessive time may damage the skin. Typically, a plucking time of around 20-30 seconds per bird is sufficient.
3. Proper plucker adjustment: Adjusting the plucker’s rotation speed and rubber fingers’ distance is crucial for efficient feather removal. Higher rotation speeds and closer finger distances provide better outcomes. However, it is important to strike a balance as excessive speed or tight finger spacing may cause skin damage.
4. Sequential plucking: Plucking chickens one by one in a sequential manner ensures a systematic approach. This method helps prevent missed feathers and improves overall efficiency.
5. Post-plucking inspection: After the plucking process, it is crucial to conduct a thorough inspection to identify any remaining pin feathers. These can be manually removed using pliers or tweezers. Inspecting under good lighting conditions aids in locating hidden feathers.
By following these efficient techniques, the process of removing pin feathers with a Chicken Plucker can be streamlined, saving time and ensuring high-quality results.
Tools and Equipment for Removing Chicken Pin Feathers
Removing chicken pin feathers requires specific tools and equipment to ensure the task is carried out effectively and efficiently.
To remove chicken pin feathers, you will need the following:
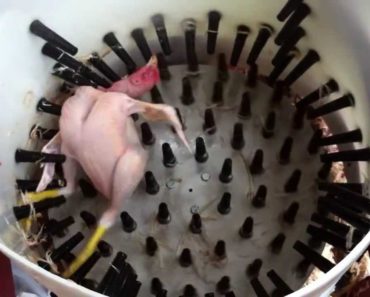
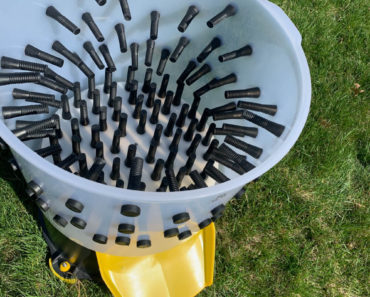
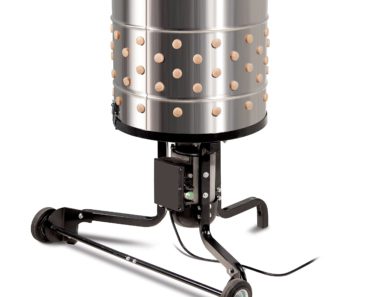
A. Plucking Machine: A chicken plucker machine is a mechanical device specifically designed to remove feathers from poultry. It consists of rubber fingers or rotating disks that gently pull out the feathers when the bird is passed through it. This machine significantly reduces the time and effort required compared to manual plucking.
B. Poultry Scalding Pot: Before using the plucking machine, it is essential to scald the chickens in hot water to loosen the feathers. A large pot or a specific scalding tank with temperature control can be used for this purpose.
C. Scalding Temperature Gauge: Maintaining the proper scalding temperature is crucial for effective feather removal. To determine the correct water temperature, you can use a scalding temperature gauge that indicates the ideal range for poultry plucking.
Step-by-Step Process of Removing Chicken Pin Feathers
Once you have the necessary tools and equipment, follow these steps to remove chicken pin feathers efficiently:
Step 1: Scald the chicken by submerging it in the hot water in the scalding pot. Ensure the water temperature is within the recommended range.
Step 2: Leave the chicken in the scalding water for a specific duration depending on the bird’s size and condition. This will help loosen the feathers and make them easier to remove.
Step 3: Take the scalded chicken and pass it through the chicken plucking machine. The rubber fingers or rotating disks will gently remove the feathers as the bird moves through the machine.
Step 4: Inspect the bird after it has been plucked by the machine. If any pin feathers are still present, manually remove them using tweezers or a plucking knife.
Step 5: Rinse the chicken with cold water to remove any remaining feathers or debris.
Tips for Efficiently Removing Chicken Pin Feathers
To ensure a smooth and effective feather removal process, consider the following tips:
A. Proper Scalding Time: Adjust the scalding time based on the size and condition of the chickens. Over-scalding can lead to cooked meat, while under-scalding may result in difficulty removing the feathers.
B. Maintenance and Cleaning: Regularly inspect and clean your plucking machine to ensure optimal performance. Remove any feathers or debris that may have accumulated during the process.
C. Work in Batches: If you have a large number of chickens to pluck, work in batches to minimize downtime and maintain efficiency. While one batch is being scalded and plucked, you can prepare the next batch for the process.
D. Safety Precautions: When operating the plucking machine, follow safety guidelines to prevent any accidents or injuries. This includes wearing appropriate protective gear and ensuring proper machine usage.
By following these guidelines and tips, you can effectively remove chicken pin feathers using a chicken plucker machine, saving time and effort in the poultry processing process.
FAQ
What are the most effective techniques for removing pin feathers from chickens using a Chicken Plucker machine?
The most effective techniques for removing pin feathers from chickens using a Chicken Plucker machine are:
1. Pre-scalding: Before placing the chicken in the Chicken Plucker machine, it is crucial to scald the bird in hot water (between 140-150°F or 60-65°C) for a few minutes. This process helps loosen the feathers and makes them easier to remove.
2. Proper positioning: Ensure the chicken is properly positioned in the Chicken Plucker machine. The bird should be centered and securely held in place to prevent any movement during the plucking process. This will ensure consistent and thorough feather removal.
3. Adjusting plucker fingers: Chicken Plucker machines come with adjustable plucker fingers that can be set according to the bird’s size. It is important to adjust these fingers to the appropriate setting to effectively remove the pin feathers without damaging the skin.
4. Multiple rotations: Run the Chicken Plucker machine in multiple rotations to ensure all the pin feathers are removed. By rotating the bird in the machine, you can reach all areas and achieve a more thorough plucking.
5. Post-plucking inspection: After running the chicken through the plucker machine, inspect the bird for any remaining pin feathers. Use tweezers or pliers to manually remove any stubborn feathers that may have been missed by the machine.
Remember to always follow the manufacturer’s instructions for your specific Chicken Plucker machine model to optimize its efficiency and performance.
Are there any specific tips or tricks for ensuring all pin feathers are thoroughly removed during the plucking process with a Chicken Plucker?
When using a Chicken Plucker, there are a few tips and tricks you can follow to ensure all pin feathers are thoroughly removed during the plucking process:
1. Proper scalding: Before plucking, it’s essential to scald the chicken in hot water to loosen the feathers. Make sure the water temperature is between 145°F to 150°F (63°C to 66°C) and immerse the bird completely for about 60 seconds.
2. Check water temperature: Throughout the plucking process, monitor the water temperature. If it drops too low, the plucking fingers might not be as effective in removing the feathers. Maintain the water temperature within the recommended range.
3. Pluck at the right time: It’s best to pluck the chicken while it is still warm. Plucking a chilled or cold bird can make the feathers harder to remove, resulting in some pin feathers being left behind.
4. Inspect and re-pluck: After the initial plucking, inspect the bird for any remaining pin feathers. Use pliers or tweezers to gently remove any missed feathers. Pay attention to areas such as the wings, tail, and lower legs where pin feathers are more common.
5. Post-plucking treatments: If you still notice stubborn pin feathers after inspection, you can try scalding the bird again briefly or using a handheld flame to singe off the remaining feathers. Be cautious while using a flame to avoid burning the skin.
Remember that thorough plucking is essential not only for aesthetic purposes but also for proper food preparation and hygiene.
Is there a recommended temperature or soaking time that helps in loosening pin feathers before using a Chicken Plucker for efficient feather removal?
Removing chicken pin feathers is an essential step in the Chicken Plucker process. With the right tools and techniques, such as using a plucking machine or hand plucking with careful precision, you can achieve a feather-free carcass that is ready for further processing. Whether you are a small-scale farmer or a backyard chicken enthusiast, mastering the art of pin feather removal is key to ensuring a high-quality end product. So, remember to be patient, thorough, and use the appropriate sanitation measures. Happy plucking!

